Introduction:
Although the concept isn’t entirely new, XMLHttpRequest technology is implimented on more sites now than ever. Compatibility is no longer an issue (IE, Mozilla and Opera all support it), and the benefits to using it are amazing. There are too many PHP programmers avoiding any work with JavaScript beyond simple form validation, and for good reason. It’s difficult to keep several languages proficiently under your belt. But using the XMLHttpRequest object is not as hard as everybody thinks, and you don’t need to buy and memorize another reference manual.
Let’s Get To It!
Asynchronous JavaScript and XML, or AJAX is a method of sending and receiving data (usually XML) from a server-side application through javascript. Since javascript offers the ability to change the contents of a web page on-the-fly, this technique allows web programmers to venture closer to programming truly interactive web applications similar to those built with Java and ActiveX.
As PHP developers, it might seem tempting to avoid the use of Javascript and leave it to the dsigner. After all, we aren’t usually programming the UI, but the processing components required by the UI. The distinction between the two is disappearing. Here’s a simple diagram that demonstrates just how AJAX works:
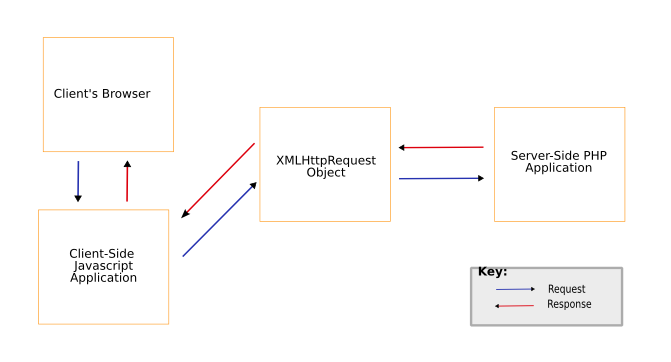
If you’re working for a small or medium sized company interested in implementing AJAX solutions, you might end up responsible for figuring out how.
XMLHttpRequest objects can be a simple way of getting data to and from a PHP application while keeping your client right at home on the same page. Our example today will allow a user to select a specific piece of software that your company makes. We will show a selection box with several categories. When a user selects a category, a request is sent to a PHP application which returns a list of applicable software. The information is used to generate a list of the results underneath the selection box. Since the information is not loaded with the initial page, your company saves bandwidth, and because the user doesn’t have to bounce from page to page for results, he will find your company’s page more inviting and faster to load.
Javascript for PHP Programmers
Since we’ll be working with Javascript, it’s good to get a basic tutorial given a background in PHP.
Variables:
Variables in javascript are declared in much the same was as in PHP. To declare a variable in javascript, use the following:
[javascript code]
var varname = varvalue; //Declaring your variable is not mandatory, but good practice.
Variables:
Variable types are handled loosely, as they are in PHP.
Control Structures:
PHP and javascript have a very similar way of using these as well… You can use if/else statements, switch statements, for and while loops and nested loops all with PHP syntax. If/elseif/else statements are a little different, but not much:
[javascript code]
var variable1 = 1; //Declare a variable.
if(variable1 == 1){
	// Increment variable value by 1
	variable1++;
	/* The following brings up a message box, a handy way of checking variable values as you
	 	   		go. Be careful not to use these in loops that are too long. */
	alert(variable1);
}else if(variable1 == 2){ //Elseif's in javascript require a space between the else and if.
	for(i=0;i<20;i++){ //For loop.
		variable1++;
	}
    	switch(variable1){ //Switch conditional
       		case 22:
           		alert("variable 1 has value of 22!");
           		break;
       		default:
           		alert("didn't have value of 22!");
			break;
	}
}else{
	alert('The final else statement');
}
Functions
To declare a function in javascript, use the following:
[javascript code]
function functioname(argument1, argument2, argument3){
	/* Arguments not provided will be null */
	if(argument3 == null){
		return argument1 + argument2
	}else{
		return argument1 + argument2 + argument3
	}
}

/* And call it with */
alert(functionname(1, 2)); //returns 3
/* or */
alert(functionname(1, 2, 3)); //returns 6
Other than the difference with default values for optional arguments, you should assign a default when a passed argument has a null value.
Using Javascript in a Document:
Javascript can be included in your document in two ways, similar to CSS inclusion:
[HTML code]
<!--Placing your javascript in the head tag of your html document is the standard-->
<script language="javascript" type="text/javascript" src="./javascript_file.js"></script>
<script language="javascript" type="text/javascript">

	/*Javscript code goes in here*/
	alert("Hello World!");
</script>
The first way is to link to the file directly, and the second is to include it on the page itself. If your code is getting long and is used on multiple pages, it is preferable to use the first method, as the browser will cache the file for future use. And that’s all you need to know about Javascript to continue.
Developing the Initial Page
Below we’re going to be creating the page the user loads to view your companies products.
[HTML code]
<html>
	<head>
		<title>CompanyXYZ Software</title>
		<script language="javascript" type="text/javascript"
			src="./internal_request.js">

		</script>
	</head>
	<body>
		<div id="product_categories">
			<!--Category selection box...-->
			<form name="form_category_select">

				<select>
					<option>Audio</option>
					<option>Games</option>
					<option>Internet</option>

				</select>
			</form>
		</div>
		<div id="product_cage">
			<!--This is where we'll be displaying the products once they're loaded-->
			^ Please select a category from above.
		</div>

	</body>
</html>
The above HTML first links to a javascript file, internal_request.js, and displays a page with two <div> tags, the second of which is where we’ll be displaying our data. Go ahead and copy the above code into a file called products.html.
Creating the XMLHttpRequest Object
The XMLHttpRequest object works differently in Internet Explorer and Mozilla-like browsers. To create an XMLHttpRequest object in IE, the following can be used:
[javascript code]
var request_o = new ActiveXObject("Microsoft.XMLHTTP");
And the following works for supporting browsers other than IE:
[javascript code]
var request_o = new XMLHttpRequest();
Determining what browser you are working with and creating the appropriate object is simple:
[javascript code]
/* The following function creates an XMLHttpRequest object... */

function createRequestObject(){
	var request_o; //declare the variable to hold the object.
	var browser = navigator.appName; //find the browser name
	if(browser == "Microsoft Internet Explorer"){
		/* Create the object using MSIE's method */
		request_o = new ActiveXObject("Microsoft.XMLHTTP");
	}else{
		/* Create the object using other browser's method */
		request_o = new XMLHttpRequest();
	}
	return request_o; //return the object
}

/* You can get more specific with version information by using
	parseInt(navigator.appVersion)
	Which will extract an integer value containing the version
	of the browser being used.
*/
Copy the above code into a file called internal_request.js, located in the same directory as the products.html file.
We now have a function that will create an XMLHttpRequest object in internal_request.js, and we have an HTML file that calls upon the code in internal_request.js. Remember how we left the product selection <div> in products.html blank? Let’s write the code that utilizes our createRequestObject function to get the list of products.
[javascript code]

/* The variable http will hold our new XMLHttpRequest object. */
var http = createRequestObject();

/* Function called to get the product categories list */
function getProducts(){
	/* Create the request. The first argument to the open function is the method (POST/GET),
		and the second argument is the url...
		document contains references to all items on the page
		We can reference document.form_category_select.select_category_select and we will
		be referencing the dropdown list. The selectedIndex property will give us the
		index of the selected item.
	*/
	http.open('get', 'internal_request.php?action=get_products&id='
			+ document.form_category_select.select_category_select.selectedIndex);
	/* Define a function to call once a response has been received. This will be our
		handleProductCategories function that we define below. */
	http.onreadystatechange = handleProducts;
	/* Send the data. We use something other than null when we are sending using the POST
		method. */
	http.send(null);
}

/* Function called to handle the list that was returned from the internal_request.php file.. */
function handleProducts(){
	/* Make sure that the transaction has finished. The XMLHttpRequest object
		has a property called readyState with several states:
		0: Uninitialized
		1: Loading
		2: Loaded
		3: Interactive
		4: Finished */
	if(http.readyState == 4){ //Finished loading the response
		/* We have got the response from the server-side script,
			let's see just what it was. using the responseText property of
			the XMLHttpRequest object. */
		var response = http.responseText;
		/* And now we want to change the product_categories <div> content.
			we do this using an ability to get/change the content of a page element
			that we can find: innerHTML. */
		document.getElementById('product_cage').innerHTML = response;
	}
}
The above code should be appended to what you already have in the internal_request.js file.
Conclusion
We’ll followup with the rest of this informative article next week, so be sure to visit us again for the conclusion! btw, don’t miss the important Quick Tips listed below!
Quick Tip 1: (Using the POST method instead of GET):
The following will send the request to the PHP file using the POST method:
	http.abort;
	http.open('post',  'back_end.php');
	http.setRequestHeader('Content-Type', 'application/x-www-form-urlencoded');
	http.send('arg1=val1&arg2=val2&arg3=val3');
Quick Tip 2: (Parsing XML results):
If you’re receiving XML instead plain-text results from your processing PHP script, you can use the javascript DOM to parse them. Suppose you receive the following:
	<product_list>
		<product id="1">
			<name>EeasySMS</name>
			<version>2.2</version>
		</product>
		<product id="2">
			<name>BabyMon</name>
			<version>1.2</version>
		</product>
	</product_list>
To receive a DOM compatible response from our XMLHttpRequest object, instead of using the responseText property, substitute the responseXML property. In this case we’ll refer to it by assigning it the variable XMLResponse.
The product_list element contains two elements of interest: product elements. In order to get to these, we can use the following:
/* Reference the product_list element to the variable product_list */
product_list = XMLReponse.getElementByTagName('product_id');

/* By substituting product_list for XMLResponse, we will be searching
	only the product_list element, not the entire response
	We also use getElementsByTagName, not getElementByTagName,
	since we are interested in all of the results, not just one. */

product_id = XMLResponse.getElementsByTagName('product');

/* getElementsByTagName produces an array, which we can access  like this:
	product_id[n], the same way we access an array item in PHP.
	Let's get the id attribute from the product elements like this: */

for(i=0; i<product_id.length; i++){ //length is the same as count($array)
	id = product_id[i].getAttribute('id') //Grabs the id attribute.
	/* To get the text from within a text node, we use firstChild.data
		for the corresponding element. */
	name = product_id[i].getElementByTagName('name').firstChild.data;
	version = product_id[i].getElementByTagName('version').firstChild.data;
}
This may seem like a bit to work with at first, but with a little work, you can get what you want to work. If you want to avoid this, you could use the responseText method, parsing the XML in PHP before sending it to the XMLHttpRequest object.
Quick Tip 3: (Relevant Links):
About the Author:
James Kassemi lives in Albuquerque, New Mexico. He works mainly with PHP, programming for a variety of clients in the southwest.