Next, scroll down to the <mx:HTTPService> tag and highlight the entire component-that is, everything between the <mx:HTTPService> tags and the tags themselves. Right-click the selected code, and then choose Source > Toggle block comment. The code will be commented out. Below the commented code, add an <mx:RemoteObject> tag. The code for the new RemoteObject is shown in Listing 7.
Listing 7. The RemoteObject created in MXML
<mx:RemoteObject endpoint="http://localhost/index.php"
id="roContactService" destination="zend" source="ContactService"
fault="handleFault(event)">
		<mx:method name="getContacts" result="handleContacts(event)" fault="handleFault(event)"/>
		<mx:method name="saveContact" result="handleSave(event)"
fault="handleFault(event)"/>
	</mx:RemoteObject>
The RemoteObject specifies the endpoint, a unique ID, a source, and a destination. The endpoint is the URL to your Zend_Amf gateway file, the destination is an arbitrary name, and the source is the name of the remote class you’re calling. There is also a handler for a fault during the communication-a function called handleFault(). Make sure your source property matches the name of the PHP file containing your methods.
Within the RemoteObject, you also declare the methods to be accessed from the client. The first method, getContacts, returns an array of Contact objects, as you’ll recall from the PHP class file. The second method, saveContact(), will be called to insert a new record into the database. Make sure these method names are exactly the same as those declared in the PHP file containing your methods.
Next, change the ActionScript code to tie everything together. Modify your
Listing 8. The script block, modified to accommodate the RemoteObject instead of HTTPService
<mx:Script>
		<![CDATA[
		import mx.collections.ArrayCollection;
		import mx.automation.codec.ArrayPropertyCodec;
		import mx.rpc.events.ResultEvent;
		import mx.rpc.events.FaultEvent;
		import com.flexandair.ContactVO;
		import mx.controls.Alert;
		import mx.utils.ArrayUtil;

		[Bindable] public var dp:ArrayCollection;

			public function handleContacts(event:ResultEvent):void {
				dp = new ArrayCollection(ArrayUtil.toArray(event.result));
				myDG.dataProvider = dp;
			}

			public function handleFault(event:FaultEvent):void {
				Alert.show(event.fault.faultDetail, event.fault.faultCode);
			}

			public function saveContact():void {
				var newContact:ContactVO = new ContactVO();
				newContact.name = nameInput.text;
				newContact.email = emailInput.text;
				newContact.phone = phoneInput.text;
				roContactService.saveContact(newContact);
			}

			public function handleSave(event:ResultEvent):void {
				roContactService.getContacts();
				nameInput.text = '';
				emailInput.text = '';
				phoneInput.text = '';
			}

		]]>
	</mx:Script>
</mx:Application>
The script block begins with several import statements, which are necessary for the application to run. Below the import statements is a variable declaration, dp. This variable is defined as an ArrayCollection, and it will hold the contact objects you receive from Zend_Amf.
As you can see, below the import statements and variable declaration, all the methods referred to in the RemoteObject are created. First, the handleContacts() method accepts the array of contacts that Zend_Amf returns. The array is converted to the ArrayCollection you defined earlier, dp, and that in turn is set as the data provider for the DataGrid. Next, there is the handleFault() function, which simply displays an alert box containing relevant information whenever a fault is encountered. The third function, saveContact(), assembles a new ContactVO object. The properties of the object are populated with values from the form. The object is then sent to the Zend_Amf server, where it is inserted into the database.
The last function, handleSave(), refreshes the data grid by calling getContacts from the RemoteObject again. The form is then cleared so that another contact can be entered. Again, the file is terminated with a closing </mx:Application> tag.
Before you can run the application, however, you must create the ContactVO class in ActionScript. To do so, right-click the src folder beneath the XMLandPHP project in Flex Builder, and then choose New > Folder. In the dialog box that appears, locate the text box near the bottom, and type com/flexandair/, as shown in Figure 7.

Figure 7. Creating a new folder in Flex Builder
Click Finish, and the new folder structure appears beneath the src folder in the left pane of Flex Builder. Right-click the flexandair folder, and then choose New > ActionScript Class. In the dialog box that appears, specify ContactVO as the name, and leave the other options set to their defaults. Click Finish. The new ActionScript class should appear in the right pane of the window. Delete the text and paste the code shown in Listing 9 in its place.
Listing 9. The ContactVO object defined in ActionScript package com.flexandair
{
	[Bindable]
	[RemoteClass(alias="ContactVO")]

	public class ContactVO
	{
		public var id:int;
		public var name:String;
		public var email:String;
		public var phone:String;

		public function ContactVO()
		{
		}

	}
}
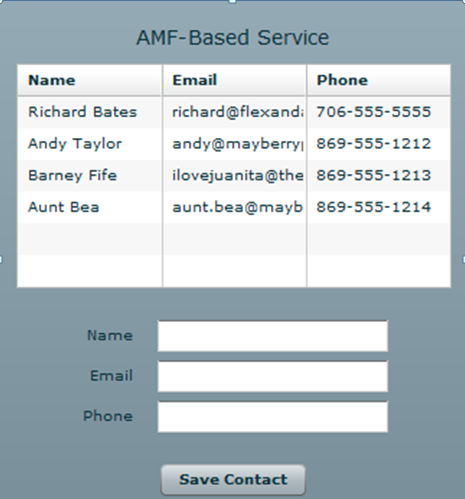
As you can see, this ActionScript file largely mirrors its PHP counterpart, Contact.php. The notable exception is the bindable element [RemoteClass(alias=”ContactVO”)]. These lines let Zend_Amf know that the alias for this class is ContactVO, thereby enabling the ActionScript-to-PHP class mapping. Save the project and run it. Your browser opens and displays something like Figure 8.

Figure 8. The Zend_Amf client running
When a new contact is added, the data grid is refreshed to reflect the change. The form is then cleared.
Note If you receive an error, it could be a result of the Flash Player security sandbox. To circumvent this error, copy the crossdomain.xml file from the attached archive to the web root directory of your web server. Again, DO NOT use this file in a production environment, as it allows remote access from any host.
Now that you’ve got Zend_Amf up and running, you can expand your services to include virtually any PHP method. What’s more, you can now access any of the powerful extensions in the Zend Framework for use in your Flex applications. To find out more about the Zend Framework, check out the Zend Framework home page. For more information on using Flex with PHP, visit Adobe’s Flex and PHP Developer Center.
About the author: Richard Bates is a Web application developer and consultant in Athens, GA. For the last 8 years, Richard has worked in this capacity in a wide spectrum of industries, with clients ranging from telecom and health care to leisure and real estate. He currently works as a Flex/AIR and PHP developer with XIG Networks, focusing on e-commerce and interactive promotional applications. He has a blog, at http://flexandair.com.


