Implementing Module Functions
Next, you need to create two modules, which will perform the following functions:
- Hide child menus so that they don’t appear in the main menu listing
- Ensure that links to child menu items appear on the corresponding content page
Hiding Child Menus
You load the list of CMS links, displayed as main menu items, into the core
oxContentList class via the oxcontentlist::_loadMenue() method. You must override this method within the scope of the module. In order to do so, create a new file at /oxid/modules/my_cms/my_cms_oxcontentlist.php and add the following code to it.
<?php
class my_cms_oxContentList extends my_cms_oxContentList_parent
{
    protected function _loadMenue( $iType, $sSQLAdd = null )
    {
       if($iType == 1) {
     $sSQLAdd .=" and my_parentident = ''";
      }
      parent::_loadMenue($iType, $sSQLAdd);
    }
}
?>
Note that the new
my_cms_oxContentList doesn’t directly extend oxContentList; instead, it extends my_cms_oxContentList_parent. This is the recommended method of extending OXID classes, as it allows numerous modules to be created and inter-linked from the same base class. Internally, OXID will automatically generate transparent classes using the following structure:
my_cms_oxContentList extends my_cms_oxContentList_parent { }
my_cms_oxContentList_parent extends oxContentList { }
The variable
$iType can have the values 0, 1, 2 or 3, depending on whether the CMS component is a snippet, main menu item, category, or manual define, respectively. The if() conditional test is used to get only data sets that don’t have a parent (for CMS components defined as main menu items). Therefore, the CMS sub-menu component Test 1.1 will not appear in the main menu.
Activating the Module
In order for the new module to work, it must be registered under the administration area (Master Settings -> Core Settings -> System -> Modules). Add the following line to the list of installed modules:
oxcontentlist => my_cms/my_cms_oxcontentlist
On the left is the name of the original class, and on the right is the path to the module file, relative to the
/oxid/modules directory and without the .php extension (see Figure 6). If there were more modules using the class oxContentList, they would be appended to the right list and separated with an ampersand (&), as below:
oxcontentlist => my_cms/my_cms_oxcontentlist&my_test/test
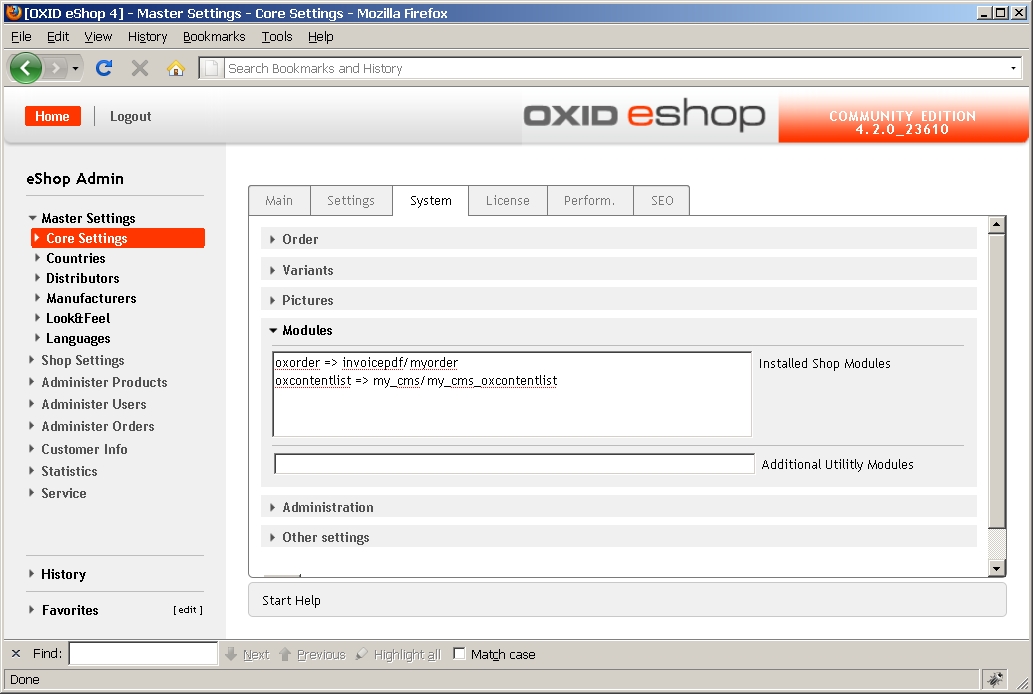
Click here for larger image
Figure 6. OXID eShop Administration: Adding a Custom Module
Displaying Child Menu Items on Content Pages
The next step is to display, for each main menu item, the sub-menu items (if available). For this, create a module based on the view class
content.php, using the following code:
<?php
class my_cms_Content extends my_cms_Content_parent
{
    public function render()
    {
        $this->_sThisTemplate = parent::render();
        $sSelect = "select oxid from oxcontents
         where my_parentident = '".$this->getContent()->oxcontents__oxloadid->value."'";
        $rs = oxDb::getDb()->Execute($sSelect);
        if($rs != false && $rs->RecordCount() > 0) {
              $aChilds = array();
                 while(!$rs->EOF) {
                 $oContent = oxNew("oxcontent");
                 $oContent->load($rs->fields[0]);
                 $aChilds[ ] = $oContent;
                 $rs->MoveNext();
           }
           $this->_aViewData['aChilds'] = $aChilds;
        }
        return $this->_sThisTemplate;
    }
}
Save this class definition to
/oxid/modules/my_cms/my_cms_content.php.
The database query in the previous listing is carried out by the ADODB object, globally available as
oxDb::getDb(). The query retrieves all CMS components whose MY_PARENTID corresponds to the OXLOADID of the current component. This produces a resultset containing all the sub-menu items of the current main menu item. A while() loop is then used to initialize new oxContent objects, load them with data, and then write them into the array $aChilds. The array is then made available to the view as a template variable.
All that’s left now is to display the
oxContent objects in the output template. Open the template file content.tpl and insert the following code under the line <div class="box">:
[{if $aChilds}]
  <div style="border:1px solid #ccc">
      Submenu:<br />
      [{foreach from=$aChilds item=oContent}]
      <a href="[{ $oViewConf->getSelfLink() }]cl=content&tpl=[{$oContent->oxcontents__oxid->value}]">
    - [{$oContent->oxcontents__oxtitle->value}]</a><br />
    [{/foreach}]
    </div>
    <br />
[{/if}]
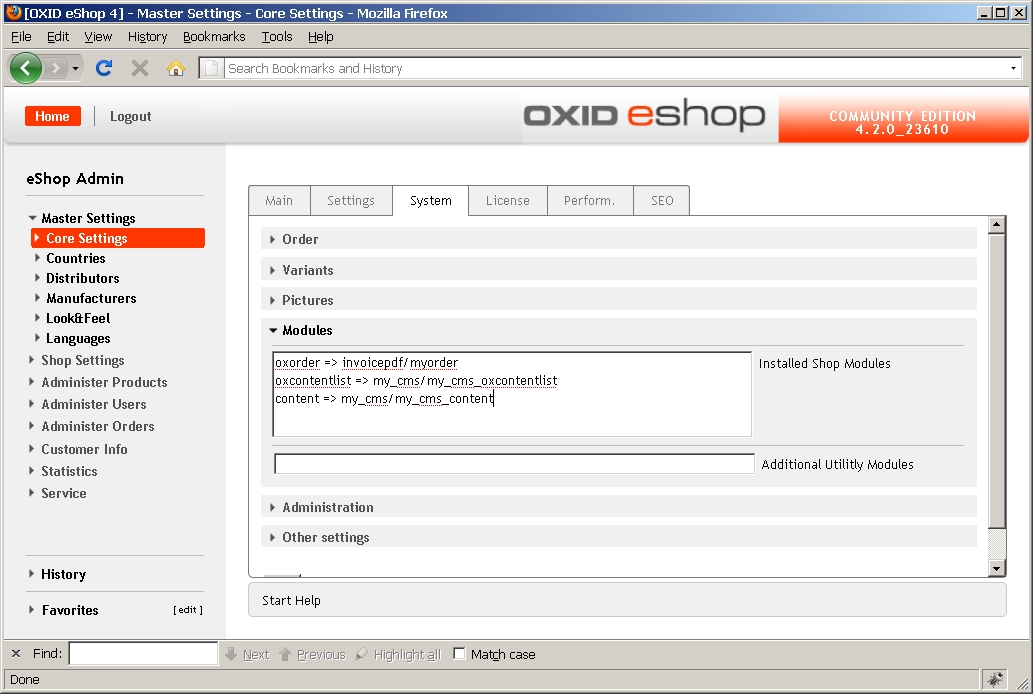
Go back to the administration area (Master Settings -> Core Settings -> System -> Modules) and add the following to the module list:
content => my_cms/my_cms_content
Figure 7 shows this added custom module.
Click here for larger image
Figure 7. OXID eShop Administration: Adding a Custom Module
Check the output in your browser. The sub-menu items for each main menu item should now be displayed (see Figure 8).
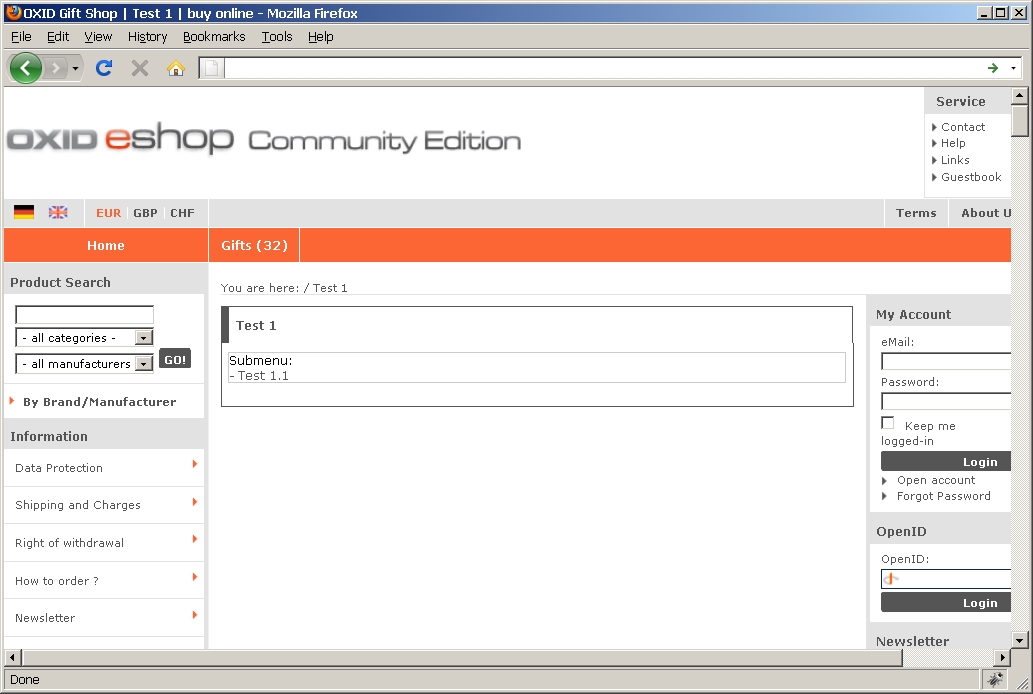
Click here for larger image
Figure 8. OXID eShop: The Main Menu with Child Menus Displayed
This simple example should illustrate that OXID offers a sophisticated framework for customizing every aspect of a merchant site. For a better understanding of the objects and methods used, study the OXID eShop API. Happy coding!
About the Author
 |
Andreas Ziethen, executive director of the anzido GmbH Dortmund, has been involved, as OXID Premium Solution Partner, in the implementation of shop projects based on the OXID eShop-Software since 2003. He acts as trainer within the OXID Academy and offers seminars, workshops and consulting for PHP, in particular, the OXID eShop. to e-mail him. |


