If you’d like to quickly build a simple dynamic website, adopting any of the many so-called lightweight PHP frameworks (10 of which I introduced in the article Top 10 Lightweight Frameworks for PHP Development) might make sense. In fact I’ve recently been experimenting with one of the frameworks introduced in the aforementioned article, namely DooPHP, and have been so impressed by its capabilities that I wanted to put together a short tutorial highlighting my favorite features.
Installing the DooPHP PHP Framework
DooPHP, short for Do OOP in PHP, is a self-described lightweight, open source framework that focuses on seven key features: MVC, REST, URI routing, object-relational mapping, template and view management, usability, and performance.
Available for download via the the DooPHP website, installation and configuration is quite trivial. Begin by downloading the latest stable version and placing the unarchived package within a Web-accessible directory. For instance I’ve placed the files within a directory called
bookmark found in my Web server’s document root. A DooPHP-powered website’s root directory is accessible by accessing the app directory from within your browser, so you should set the site’s document root accordingly. Once you’ve set the document root and restarted your Web server, you’ll be able to access your new site’s default home page, depicted in Figure 1.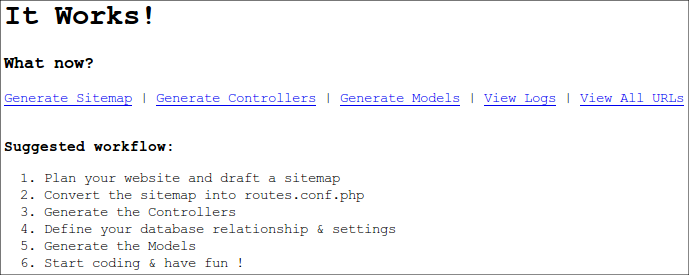
Click here for larger image
Figure 1. A DooPHP Application’s Default Home Page
Creating a Route, Controller, and Action in DooPHP Framework
Creating DooPHP-powered “pages” is accomplished in a few short steps. For starters suppose you want to create an About page, accessible via the URL
www.example.com/about/. You’ll begin by defining the route within the routes.conf.php file, located in app/protected/config. Open this file and scroll down the page until you find these lines:
$route['*']['/'] = array('MainController', 'index');

$route['*']['/error'] = array('ErrorController', 'index');
Below these lines add the following line:
$route['get']['/about'] = array('AboutController', 'index');
This tells DooPHP to allow only GET requests to the URI
/about, and when the request is made serve the index action found in the About controller.Save the
routes.conf.php file, and then create a new controller file named AboutController.php, and placing it within the app/protected/controller/ directory. DooPHP controllers are standard PHP class files which extend DooPHP’s DooController class, so your AboutController.php file would look like this:
<!--p

class AboutController extends DooController {

}
</p-->
Within the class you’ll define methods (actions) which correspond to specific “pages” falling within the
about “folder”. I enclose these terms in quotations because they serve as convenient visual descriptors despite the physical structure not actually existing within a DooPHP-powered website. Because in the routes.conf.php file we specified that the index action be contacted for this particular route, define a method named index which looks like this:
function index() {
  echo 'Hello World!';
}
Save the file and navigate to your site’s
/about/ URI and you’ll see the phrase Hello World! output to the browser.Creating a View in the DooPHP Framework
Of course the main advantage of embracing an MVC-based framework is the ability to separate logic and presentation, so outputting data from the controller action isn’t particularly useful for real world purposes. Instead you’ll want to create a view which presents the data associated with a particular action. Start by creating a directory named
about and placing it within app/protected/view/. Within the about directory create a file named index.html and add to it the following contents:
<h2>About Us</h2>
{{message}}
DooPHP treats anything within the double curly brackets as placeholders passed in from the associated controller action. So next let’s modify the
About controller’s index method to look like this:
function index() {

  $this->data['message'] = 'Hello World!';

  $this->view()->render('about/index', $this->data);

}
The modified action begins by assigning the message to an associative array named
$this->data. Notice how the associative array’s key is named identically to the placeholder found in the view. Next we identify the view which should be rendered in conjunction with this particular action using the $this->view()->render() method, passing along both the location and name (sans extension) of the view, and the associative array we’d like to pass into the view.Reload the page within your browser and you’ll see that the placeholder is replaced with the message
Hello World!.


