Learn more about the ins and outs of the main message services available in PHP:
1. SEMAPHORE
2. GEARMAN
3. JMS WITH PHP THROUGH:
A. QUERCUS
B. PHPMQ->MANTARAY
1. Semaphore
Semaphore is a PHP module that actually consists of three extensions which includes semaphores, shared memory and inter-process messaging (IPC). This module provides wrappers for the System V IPC family of functions and to use it in PHP, you need to enable it because it is not enable by default, so to enable the System V semaphore support PHP use the option–enable-sysvsem to enable the System V shared memory support compile PHP use the option–enable-sysvshm and to enable the System V messages support compile PHP use the option–enable-sysvmsg.
*Note: The Semaphore module is not available on Windows platforms.
To use the inter-processing messaging (IPC) extension in Semaphore we have available a set of functions, displayed below:
• msg_get_queue: Create or attach to a message queue resource msg_get_queue ( int $key [, int $perms = 0666 ] )- returns an id that can be used to access the System V message queue with the given key.
• msg_queue_exists: Check whether a message queue exists bool msg_queue_exists ( int $key
• msg_receive: Receive a message from a message queue bool msg_receive ( resource $queue , int $desiredmsgtype , int &$msgtype , int $maxsize ,mixed &$message [, bool $unserialize = true [, int $flags = 0 [, int &$errorcode ]]] )– will receive the first message from the specified queue of the type specified by desiredmsgtype.
• msg_remove_queue: Destroy a message queue bool msg_remove_queue ( resource $queue ) - destroys the message queue specified by the queue. Only use this function when all processes have finished working with the message queue and you need to release the system resources held by it.
msg_send: Send a message to a message queue bool msg_send ( resource $queue , int $msgtype , mixed $message [, bool $serialize = true [,bool $blocking = true [, int &$errorcode ]]] ) – sends a message of type msgtype (which MUST be greater than 0) to the message queue specified by queue.
• msg_set_queue: Set information in the message queue data structure bool msg_set_queue ( resource $queue , array $data ) – allows you to change the values of the msg_perm.uid, msg_perm.gid, msg_perm.mode and msg_qbytes fields of the underlying message queue data structure.
• msg_stat_queue: Returns information from the message queue data structure array msg_stat_queue ( resource $queue ) – returns the message queue meta data for the message queue specified by the queue
2. Gearman
Gearman is an application framework used to work with multiple processes and allows applications to complete tasks in parallel and to call functions between languages. The framework can be used in a variety of applications, from high-availability web sites to the transport of database replication events and consists of two main components: the job server and a Client and Worker API. The Client and Worker API can be used in a wide variety of languages, but the job server is only available as a C library or a Perl library. This fact makes it difficult to make the server run on Windows, mainly when you start running into some of the dependencies that are necessary for this application framework to be installed.
You can install Gearman application framework in two ways:
1. Using a pure PHP API named Net_Gearman using the pear install Net_Gearmancommand
2. As a PHP extension using this tutorial http://www.phpvs.net/2010/11/30/installing-gearman-and-gearmand-on-windows-with-cygwin/. This extension provides classes for writing Gearman clients and workers.
3. JMS in PHP Through Quercus
As you probably know, most features of JMS are designed for message-driven services which, in the Java world, are very suitable, but not appropriate for PHP. In order to use these features in PHP, you need to implement Java using different technology, in this case, Quercus.
Java Message Service (JMS) is a messaging standard that allows application components based on the Java Enterprise Edition (Java EE) to create, send, receive and read messages. The communication can be also asynchronous (a JMS provider can deliver messages to a client as they arrive; a client does not have to request messages in order to receive them) or reliable (The JMS API can ensure that a message is delivered once and only once. Lower levels of reliability are available for applications that can afford to miss messages or to receive duplicate messages).
Quercus) is Caucho Technology’s 100% Java implementation of PHP 5, released under the Open Source GPL license. Quercus comes with many PHP modules and extensions, such as PDF, PDO, MySQL and JSON, and allows for tight integration of Java services with PHP scripts, so using PHP with JMS is very handy. Quercus also offers a handy messaging interface using Java Message Service, so this makes it possible to send and receive messages using the Resin JMS implementation or any other messaging service with a JMS implementation, as you will see next in this section. To install and use Quercus you have two possibilities that we will present during this section:
A) Using Resin Web server (http://caucho.com/products/resin/download), Quercus is a feature of Caucho Technology’s Resin Application Server and is built into Resin – there is no additional download/install. To install resin on Windows, follow the steps from http://www.caucho.com/resin-3.1/doc/resin-web-server.xtp#GettingStarted. To test the resin installation http://localhost:8080 in the browser.
To use JMS in Quercus you need to configure JMS for PHP and Java, so to do this you need to set up a ConnectionFactory and a Queue, both placed in the resin-web.xml file, placed in WEB-INF:
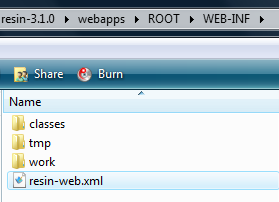
resin-web.xml
<web-app xmlns="http://caucho.com/ns/resin"
	 xmlns:resin="urn:java:com.caucho.resin">

  <!--    - JMS MemoryQueue   -->
  <resin:MemoryQueue>
    <Named>Queue</Named>
  </resin:MemoryQueue>

  <resin:JmsConnectionFactory/>

  <!--
     - MyListener receives messages from the queue and stores them in
     - the MessageStore
    -->
  <ejb-message-bean class="example.MyListener">
    <destination>#{Queue}</destination>
  </ejb-message-bean>
</web-app>
The programming model of the Quercus JMS interface is first to get access to the queue using the java_bean() call which will look for the named bean in the resin-web.xml, in this case, queue. Since the Queue implements the java.util.concurrent.BlockingQueue API, the PHP script can send data to the queue directly using offer() and receive messages with poll().
<?php

if (array_key_exists("message", $_POST)) {
  $queue = java_bean("Queue");

  if (! $queue) {
    echo "Unable to get message queue!n";
  } else {
    if ($queue->offer($_POST["message"]) == TRUE) {
      echo "Successfully sent message '" . $_POST["message"] . "'";
    } else {
      echo "Unable to send message '" . $_POST["message"] . "'";
    }
  }
}

?>
The script checks a POST variable “message” and if it is set, sends the value of that variable to a JMS queue. A Message Driven Bean (MDB) receives these messages and records them. The record is displayed by a servlet.
B) The second way to use Quercus is using NetBeans IDE and GlassFish as the server. To use Quercus within NetBeans you should follow these steps:
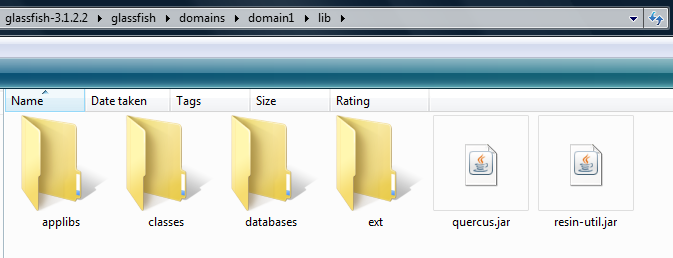
1) Unjar quercus-4.0.39.war (http://quercus.caucho.com/) and copy the JAR files in “WEB-INF/lib” directory to “GLASSFISH_HOME/domains/domain/lib” directory.
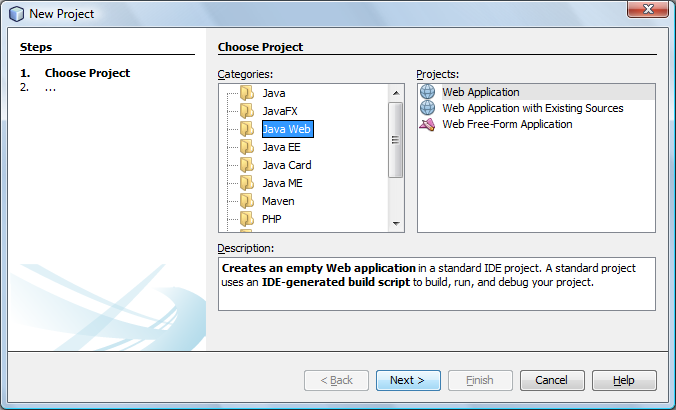
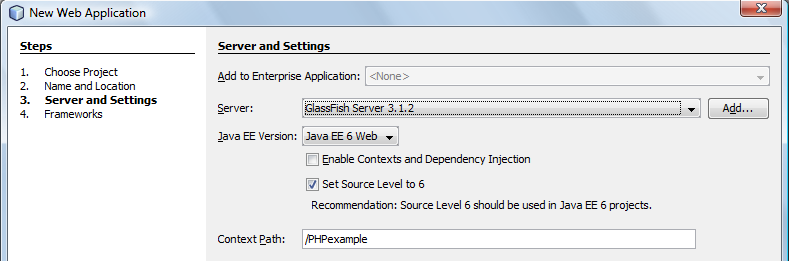
2) Create a new Web application project, “PHPexample”, using NetBeans IDE and choose GlassFish as the server:
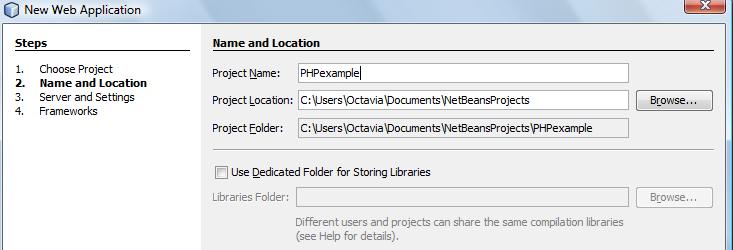
After you press Finish button, the folder with the next structure will be created:
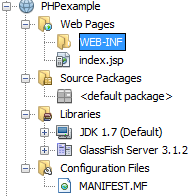
3) In the WEB-INF folder create the web.xml file (if you don’t have it) File-New-Empty file and put the text below into it and save it.
<?xml version="1.0" encoding="UTF-8"?>
<web-app xmlns="http://java.sun.com/xml/ns/javaee"
  xmlns:xsi="http://www.w3.org/2001/XMLSchema-instance"
  xsi:schemaLocation="http://java.sun.com/xml/ns/javaee http://java.sun.com/xml/ns/javaee/web-app_2_5.xsd"
  version="2.5">
  <description>Caucho Technology's PHP Implementation, Running on GlassFish Java EE 5</description>
  <servlet>
    <servlet-name>Quercus Servlet</servlet-name>
    <servlet-class>com.caucho.quercus.servlet.QuercusServlet</servlet-class>
  </servlet>
  <servlet-mapping>
    <servlet-name>Quercus Servlet</servlet-name>
    <url-pattern>*.php</url-pattern>
  </servlet-mapping>
  <welcome-file-list>
    <welcome-file>index.php</welcome-file>
  </welcome-file-list>
</web-app>
This will declare PHP engine as the servlet.
4) Into the main project, PHPexample, create the PHP file named index.php with the context:
<?php
echo "Hello World!";
phpinfo();
?>
This page prints “Hello World!” on the browser and some configuration settings of PHP. The directory structure of the created project looks like:
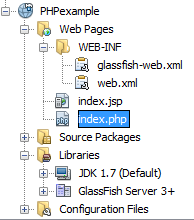
Notice that the “index.jsp” is only a template file to get started with JSPs, but is not relevant for this test.
5) Run the PHP application in GlassFish at http://localhost:8080/PHPexample/index.php/ and you should get the output below:
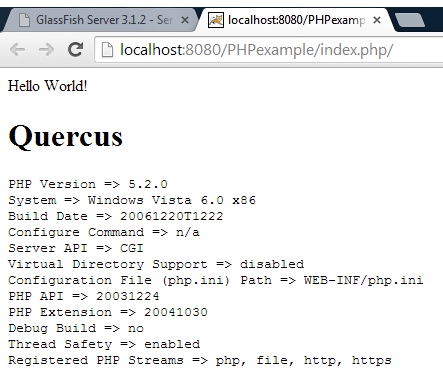
Once you have seen that Quercus works in NetBeans IDE and GlassFish as server, you can try to use all the JMS features and all the other extensions which come with Quercus.
4. JMS in PHP Through PHPMQ
PHPMQ is an open source peer-to-peer messaging toolkit for PHP, giving the PHP developer the ability to perform JMS operations, such as sending and receiving messages on queues and topics, while ensuring delivery and enabling persistent messaging. It opens new possibilities to PHP developers who can now access back office data that is usually accessible only to application servers and legacy messaging solutions.
PHPMQ Mantaray is a distributed, peer-to-peer, server-less communication & messaging solution for JAVA (JMS), C++ and .NET applications, integrates with JBoss, WebLogic & WebSphere. It offers guaranteed delivery, security and transactions and supports TCP, SSL & HTTP protocols.
Installation of PHPMQ:
→ Download and install the MantaRay messaging bus
→ Configure the MantaRay to enable the RMI API and to create an RMI registry (See RMI API documentation in the mantaray project)
→ Run the mantaray as a standalone application
→ Enable the php-java extension in phi.ini – more information at http://www.php.net/manual/en/ref.java.php
→ Add the phpmq.jar (found in this zip) and the manta.jar (found in the mantaray zip) to the php.ini “java.class.path” property
→ Run the examples (chat.php for topics and queue_receiver.php, queue_sender.php for queues)
The PHPMQ messaging API includes the following functions:
→ function enqueue($userId, $queueName, $message) – sends $message (string) to a queue with name $queueName (string) ,$userId (string) is the identifier in the messaging bus
→ function dequeue($userId, $queueName) – returns a string message dequeued from queue with name $queueName (string) $userId (string) is the identifier in the messaging bus.
→ function getQueues() – returns an array of strings that are the queues names available on the message bus
→ function getTopics() – returns an array of strings that are the topics names available on the message bus
→ function subscribe($userKey $topicName, $messagesToCash) – added a listener to a given $topicName (string) , the listener will gather up to $messagesToCash (number) messages , $userId (string) is the identifier in the messaging bus
→ function getMessageFromTopic($userKey, $topicName) – gets the messages gathered by the listener on a given $topicName (string) assuming that you invoked subscribe with the same $userKey (string)
→ function publishMessage($userKey, $topicName, $msg) – publish a $msg (string) of a topic with name $topicName (string), $userId (string) is the identifier in the messaging bus
Now you are familiar with the main messaging services in PHP.