Creating the XML service in PHP
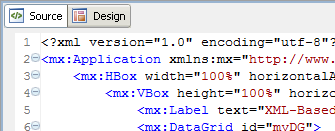
Figure 2. Select the Source view in Flex Builder
Once in Source view, delete all the code. Then, paste the code shown in Listing 1.
Listing 1. A data grid and form created with MXML in Flex Builder
<?xml version="1.0" encoding="utf-8"?>
<mx:Application xmlns:mx="http://www.adobe.com/2006/mxml"
layout="vertical" creationComplete="xmlService.send()">
	<mx:HBox width="100%" horizontalAlign="center">
		<mx:VBox height="100%" horizontalAlign="center">
			<mx:Label text="XML-Based Service" fontSize="14"/>
			<mx:DataGrid id="myDG">
				<mx:columns>
					<mx:DataGridColumn headerText="Name" dataField="name"/>
					<mx:DataGridColumn headerText="Email" dataField="email"/>
					<mx:DataGridColumn headerText="Phone" dataField="phone"/>
				</mx:columns>
			</mx:DataGrid>
			<mx:Form>
				<mx:FormItem label="Name">
					<mx:TextInput id="nameInput"/>
				</mx:FormItem>
				<mx:FormItem label="Email">
					<mx:TextInput id="emailInput"/>
				</mx:FormItem>
				<mx:FormItem label="Phone">
					<mx:TextInput id="phoneInput"/>
				</mx:FormItem>
			</mx:Form>
			<mx:Button label="Save Contact" click="saveContact()"/>
		</mx:VBox>
	</mx:HBox>
The above code creates the visible components you need to show a data grid containing the contacts from the database and a form for adding a new contact. Next, create an HTTPService to call the XMLService.php file you created earlier. Listing 2 shows this service.
Listing 2. The HTTPService
<mx:HTTPService id="xmlService" url="http://localhost/XMLService.php" useProxy="false" result="handleXML()" method="POST">
		<mx:request xmlns="">
			<name>
				{nameInput.text}
			</name>
			<email>
				{emailInput.text}
			</email>
			<phone>
				{phoneInput.text}
			</phone>
		</mx:request>
	</mx:HTTPService>
The first property of the HTTPService, id, is used to refer to the service elsewhere in the code. The url property should reflect the location of the XMLService.php file you created earlier. The useProxy property is set to False, because you won’t be using a proxy to access the XMLService.php file. On a result from the HTTPService, the result property dictates that the function handleXML() be called. (You’ll create this result handler momentarily.) The last property specified for the HTTPService is the method. You can send variables to PHP using POST or GET. Your PHP code will be expecting POST variables; therefore, POST is specified for the method here.
Below the properties of the HTTPService but still within the HTTPService tags, the code also builds a request to send a new contact to be added. The request begins with an tag set. Within the tags, you specify the variables to be part of the request. Each element should be placed in tags containing the name of the variable. For example, the element will be passed to PHP and accessible using $_POST[‘name’]. The values of the POST data fields are bound to the form inputs you created above. In addition to the MXML code you’ve already added to XMLandPHP.mxml, you need a couple of ActionScript functions. To create those, paste the code block in Listing 3 below the HTTPService.
Listing 3. An ActionScript code block with functions to send and handle received data
<mx:Script>
		<![CDATA[

			public function handleXML():void {
				myDG.dataProvider = xmlService.lastResult.contacts.contact;
			}

			public function saveContact():void {
				xmlService.send();
				nameInput.text = '';
				emailInput.text = '';
				phoneInput.text = '';
			}
		]]>
	</mx:Script>
</mx:Application>
The first function, handleXML(), simply sets the data grid’s source data to the XML received from PHP. It also specifies that contact is the repeating element to be displayed. The second function, saveContact, calls the send() method of the HTTPService. When the send() method of an HTTPService is called, the request is sent to the URL specified in the MXML <HTTPService> tag. If the new contact fields in the MXML form are filled in, the PHP code will receive the values as POST variables. The following three lines of the code clear the MXML form to prepare it for another entry. Finally, the script block is terminated, followed by a closing </mx:Application> tag.
Before you run the application, you must add some code to the XMLService.php file to handle POST variables from Flex. This code checks to see whether the POST variables for a new contact are present. If they are, those variables are inserted into the database as a new contact. Place this code on line 6 of XMLService.php file, directly under the $dbh declaration:
if ($name != '' && $email != '' && phone != '') {
	$insert = "INSERT INTO contacts.contacts (id, name, email, phone)
VALUES (NULL, '$name', '$email', '$phone')";
	$doInsert = mysql_query($insert, $dbh);
}
Now that the PHP is complete, save and run the XMLandPHP application. Your browser should present you with something similar to Figure 3.
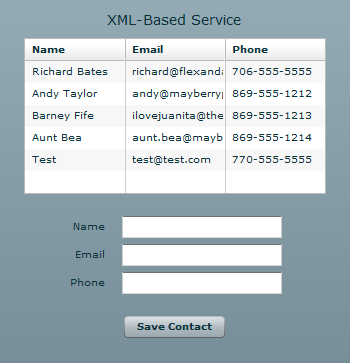
Figure 3. The XML-based application in action
As you enter new contacts, the data grid should be updated and the form should be cleared. Note If you receive an error, it could be a result of the Adobe Flash Player security sandbox. To circumvent this error, copy the crossdomain.xml file from the attached archive to the web root directory of your web server. Again, DO NOT use this file in a production environment, as it allows remote access from any host.
So, Flex with PHP and XML works, and it works well for limited purposes and on a small scale. But what if your Flex application uses custom objects or needs to economize bandwidth? Sending large blocks of XML text is inefficient, and using consistent, strongly typed objects can offer many benefits. To get that functionality across Flex and PHP, you need to use AMF. To integrate the binary AMF format with PHP, you need the Zend Framework and its Zend_Amf extension.
Come back next week when we get into the discussion of Remote objects and Zend_Amf!


