In a recent article I introduced the Fuel PHP framework, which shows great promise despite its status as a relative newcomer to the crowded PHP framework market. While hopefully this introductory tutorial helped to acquaint you with fundamental Fuel concepts, it barely scratched the surface in terms of its impressive capabilities, so I thought it would be worthwhile to pen a follow-up article which examines a feature fundamental to almost any web application no matter how small: database integration.
In this tutorial I’ll show you how to configure your Fuel application to interact with a MySQL database (Fuel currently supports MySQL, MySQLi, and PDO). Additionally, you’ll learn how to use Fuel’s convenient schema migration feature, useful for evolving database schemas over time, and the scaffolding feature, useful for generating CRUD functionality.
Configuring MySQL with Fuel
Logically the first thing you’ll want to do when integrating a MySQL database into your Fuel application is to create a database. I’ll use the mysqladmin command-line client to create a database named dev_example_com:
$ mysqladmin -u root -p create dev_example_com
With the database created, next you should update your Fuel application’s database configuration file to point to the newly created database. This configuration file is called db.php, and it resides in the /fuel/app/config directory. Open this file and you’ll see there are several arrays which look identical except for the array key title. Each title is representative of an environment. For instance when developing the application, your environment should be set to DEVELOPMENT. When deploying the application to production, you’ll set the environment to PRODUCTION (the environment can be set in the /fuel/app/config/config.php file). With this in mind, these arrays are useful for setting environment-specific variables, such as the database configuration parameters. Here’s the DEVELOPMENT array as I’ve updated it to use the dev_example_com database:
Fuel::DEVELOPMENT => array(
  'type'      => 'mysql',
  'connection'  => array(
    'hostname'   => 'localhost',
    'database'   => 'dev_example_com',
    'username'   => 'dev_example_user',
    'password'   => 'secret',
    'persistent' => false,
  ),
  'table_prefix' => '',
  'charset'      => 'utf8',
  'caching'      => false,
  'profiling'    => false,
),
In addition to database connection parameters, you can optionally identify a table prefix and character set, enable caching, and enable a profiler which will output various potentially useful pieces of information pertinent to query performance.
Next you’ll need to enable Fuel’s ORM package. Because Fuel interacts with a database via this package, you’ll need to make it available to your application. This is easily done by “uncommenting” the following line from your config.php file:
'packages'  => array(
  //'orm',
),
Creating a Model and Migration with Fuel
In keeping with MVC conventions, we’ll want to create a series of models which will serve as the conduit for managing the behavior of and data found within the dev_example_com database. To keep things simple, in this article I’ll use a single table named products, and therefore will create an associated model named Product. As an added bonus, we can generate a file (known as a migration) which can subsequently be used to generate the products table schema.
Popularized by the Ruby on Rails framework, database migrations offer a convenient way to generate and evolve your database tables in a rigorous fashion. Let’s use Fuel’s migrations feature to create a table named products, used to manage our fictitious company’s product catalog.
To generate the model, open a terminal window and use the Oil utility (introduced in the previous article):
$ oil generate model product title:varchar[255] inventory:int description:text
  Creating model: /var/www/dev.example.com/fuel/app/classes/model/product.php
	Creating migration: /var/www/dev.example.com/fuel/app/migrations/001_create_products.php
With the model and migration in place, let’s perform the migration. Each migration is referred to by a version number. Because no migrations have yet been executed, we’re currently at version 0. Therefore, migrate to version 1 by executing the following command:
$ oil refine migrate version=1
  Migrated to version: 1.
After executing the migration, head over to the database and you’ll see that the products table has been created, complete with not only the desired columns, but additionally a primary key and two timestamps:
mysql> describe products;
+-------------+---------------+------+-----+---------+----------------+
| Field       | Type          | Null | Key | Default | Extra          |
+-------------+---------------+------+-----+---------+----------------+
| id          | int(11)       | NO   | PRI | NULL    | auto_increment |
| title       | varchar(255)  | NO   |     | NULL    |                |
| inventory   | int(11)       | NO   |     | NULL    |                |
| description | text          | NO   |     | NULL    |                |
| created_at  | int(11)       | NO   |     | NULL    |                |
| updated_at  | int(11)       | NO   |     | NULL    |                |
+-------------+---------------+------+-----+---------+----------------+
6 rows in set (0.00 sec)
In the database you’ll also find a table named migrations. Fuel uses this table to keep track of the current version number so be sure to not delete or modify this table.
If you’re interested in learning how to use Fuel’s ORM capabilities, jump ahead to the section “Using the ORM”. Otherwise, read on to learn about an even more convenient approach to not only creating a model and migration, but also a whole bunch of code useful for carrying out CRUD (Create, Retrieve, Update, and Delete) operations.
Generating a Scaffold with Fuel
Scaffolding is another very convenient feature popularized by the Rails framework and embraced within Fuel. The code generated as part of a scaffold helps you to quickly get started carrying out CRUD (Create, Retrieve, Update, and Delete) operations. Fuel provides an easy way to simultaneously create a scaffold alongside a model and migration. Let’s create a scaffold for the products table:
$ oil generate scaffold product title:varchar[255] inventory:int description:text
  Creating model: /var/www/dev.example.com/fuel/app/classes/model/product.php
  Creating migration: /var/www/dev.example.com/fuel/app/migrations/001_create_products.php
  Creating controller: /var/www/dev.example.com/fuel/app/classes/controller/products.php
  Creating view: /var/www/dev.example.com/fuel/app/views/products/index.php
  Creating view: /var/www/dev.example.com/fuel/app/views/products/view.php
  Creating view: /var/www/dev.example.com/fuel/app/views/products/create.php
  Creating view: /var/www/dev.example.com/fuel/app/views/products/edit.php
  Creating view: /var/www/dev.example.com/fuel/app/views/products/_form.php
As you can see, quite a few files have been generated, among them the model, migration, a controller named products, and several associated actions and views. Before talking more about these files, run the migration as demonstrated previously:
$ oil refine migrate version=1
  Migrated to version: 1.
With the products table in place, you can immediately begin using the scaffolding to manage and review its contents. Because the table is empty, head over to your application’s /products/create page to add a product. You should see the screenshot presented in Figure 1.
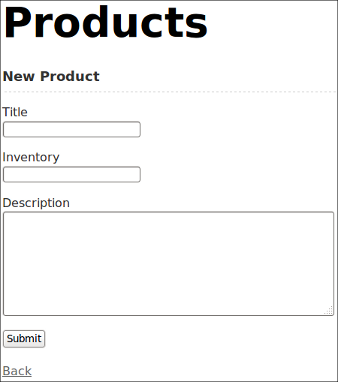
Figure 1. Adding a Product Using the Scaffold
After adding a few products, you’ll be able to visit /products/ to review a listing, as depicted in Figure 2.
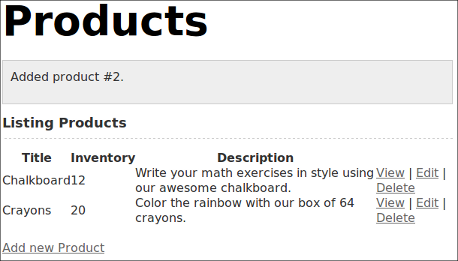
Figure 2. Viewing Products in FuelPHP Application
Not only is scaffolding useful for quickly updating a table, but you can also review the scaffold source code to learn more about how data is managed and retrieved via the ORM package!
Using the Fuel ORM
With the Product model created, you can use Fuel’s ORM package to interact with the database. Although native capabilities are available for carrying out all of the CRUD operations, I’ll focus specifically on retrieving data. To find a record having the title of Chalkboard, use the following snippet:
$product = Model_Product::find()->where('title', 'Chalkboard');
printf("The product inventory is %d", $product->get_one()->inventory);
Looping over a list of all products is equally easy:
$products = Model_Product::find('all');

foreach ($products AS $product) {
  echo $product->inventory;
}
Beyond basic ORM capabilities you can construct custom queries, define model relations, and carry out a variety of utility operations.


