Configure the Database for Bookshop
configure:database task, like this:
On Windows:
c:demo>php symfony configure:database
  "mysql:host=localhost;dbname=symfonydb"
  root pass

On Linux:
$ php symfony configure:database
  "mysql:host=localhost;dbname=symfonydb"
  root pass
Note: The
configure:databasetask takes three arguments: thePDO DSN, theusername, and thepassword(optional) to access the database.
Note: The Symfony framework supports all PDO-supported databases, like MySQL, PostgreSQL, SQLite, Oracle, MSSQL, and so on.
Note: Theconfigure:databasetask stores the database configuration into the/config/databases.ymlconfiguration file. Instead of using the task, you can edit this file by hand.
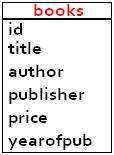
config/schema.yml file, like this:
# config/schema.yml
propel:
  books:
    id:            ~
    title:         { type: varchar(255), required: true }
    author:        { type: varchar(255), required: true }
    publisher:     { type: varchar(255), required: true }
    price:         { type: varchar(255), required: true }
    yearofpub:     { type: varchar(255), required: false }
schema.yml, you can generate the proper SQL statements by running the propel:build-sql task, like this (the statements will be stored in the data/sql/ directory, optimized for the database engine you have configured, MySQL):
On Windows:
c:demo>php symfony propel:build-sql

On Linux:
$ php symfony propel:build-sql
data/sql/ folder, you will find the lib.model.schema.sql file with the following content:
# This is a fix for InnoDB in MySQL >= 4.1.x
# It "suspends judgement" for fkey relationships until are tables are set.
SET FOREIGN_KEY_CHECKS = 0;

#-----------------------------------------------------------------------------
#-- books
#-----------------------------------------------------------------------------

DROP TABLE IF EXISTS `books`;


CREATE TABLE `books`
(
   `id` INTEGER  NOT NULL AUTO_INCREMENT,
   `title` VARCHAR(255)  NOT NULL,
   `author` VARCHAR(255)  NOT NULL,
   `publisher` VARCHAR(255)  NOT NULL,
   `price` VARCHAR(255)  NOT NULL,
   `yearofpub` VARCHAR(255),
   PRIMARY KEY (`id`)
)Type=InnoDB;

# This restores the fkey checks, after having unset them earlier
SET FOREIGN_KEY_CHECKS = 1;
propel:insert-sql task, like this:
On Windows:
c:demo>php symfony propel:insert-sql

On Linux:
$ php symfony propel:insert-sql
propel:build-model task, like this (the generated PHP files are stored in lib/model/ folder):
On Windows:
c:demo>php symfony propel:build-model

On Linux:
$ php symfony propel:build-model
data/fixtures/ directory and use the propel:data-load task to load them into the database.
fixtures.yml):
# data/fixtures/fixtures.yml
books:
 1:
  title: SOA Patterns with BizTalk Server 2009
  author: Richard Seroter
  publisher: Packt
  price: E25.89
  yearofpub: 2009
 2:
  title: Learning FreeNAS
  author: Gary Sims
  publisher: Packt
  price: E17.49
  yearofpub: 2008
 3:
  title: MODx Web Development
  author: Antano Solar John
  publisher: Packt
  price: E17.49
  yearofpub: 2009
 4:
  title: Apache Maven 2 Effective Implementation
  author: Brett Porter, Maria Odea Ching
  publisher: Packt
  price: E17.49
  yearofpub: 2009
 5:
  title: RESTful PHP Web Services
  author: Samisa Abeysinghe
  publisher: Packt
  price: E14.99
  yearofpub: 2008
propel:data-load task:
On Windows:
c:demo>php symfony propel:data-load

On Linux:
$ php symfony propel:data-load
Note: If you have decided to create the tables by writing SQL statements, you can generate the corresponding
schema.ymlconfiguration file by running thepropel:build-schematask:
Note: You can compress all the tasks executed in this section by running a single one-named
propel:build-all-loadtask, like this:
Generate the Web Pages
propel:generate-module task, like this (you generate the book module for the books model):
On Windows:
c:demo>php symfony propel:generate-module --with-show --non-verbose-templates frontend book books

On Linux:
$ php php symfony propel:generate-module --with-show --non-verbose-templates frontend book books
apps/frontend/modules/book/ directory (explore those files):
| Directory | Description |
|---|---|
actions/ |
The module actions |
templates/ |
The module templates |
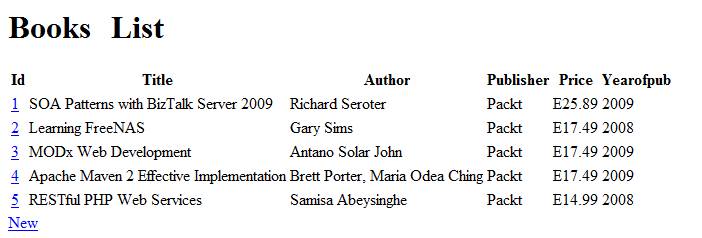
Click here for larger image
Figure 5. Testing the Book Module in the Browser
Customize Web Pages
layout.php and you can find it in the apps/frontend/templates/ directory. This directory contains all the global templates for an application.
<!DOCTYPE html PUBLIC "-//W3C//DTD XHTML 1.0 Transitional//EN"
"http://www.w3.org/TR/xhtml1/DTD/xhtml1-transitional.dtd">
<html xmlns="http://www.w3.org/1999/xhtml" xml:lang="en" lang="en">
  <head>
    <?php include_http_metas() ?>
    <?php include_metas() ?>
    <?php include_title() ?>
    <link rel="shortcut icon" href="/favicon.ico" />
    <?php include_stylesheets() ?>
    <?php include_javascripts() ?>
  </head>
  <body>
    <table border="0" width="100%">
       <tr>
          <td>
           <img src="/images/books_banner.png" alt="header"/>
          </td>
          <form action="" method="get">
           <td bgcolor="black">
             <font color="white">Search:</font>
             <input size="45" type="text" >
             <input type="submit" value="Search" >
             <font type="arial" size="25" color="yellow">
             <a href="/frontend_dev.php/books/new">New book</a></font>
           </td>
          </form>
       </tr>
       <tr>
         <td align="center" colspan="2">
             <?php echo $sf_content ?>
         </td>
       </tr>
       <tr>
         <td colspan="2">
           <img src="/images/footer.jpg" height="40" width="100%" alt="footer"/>
         </td>
       </tr>
    </table>
  </body>
</html>
Note: The stylesheets, images, JavaScript and uploads are stored by default under the
/webfolder (in/css,/images,/js, and/uploadsfolders, respectively). Therefore, you should place your images under the/imagesfolder.
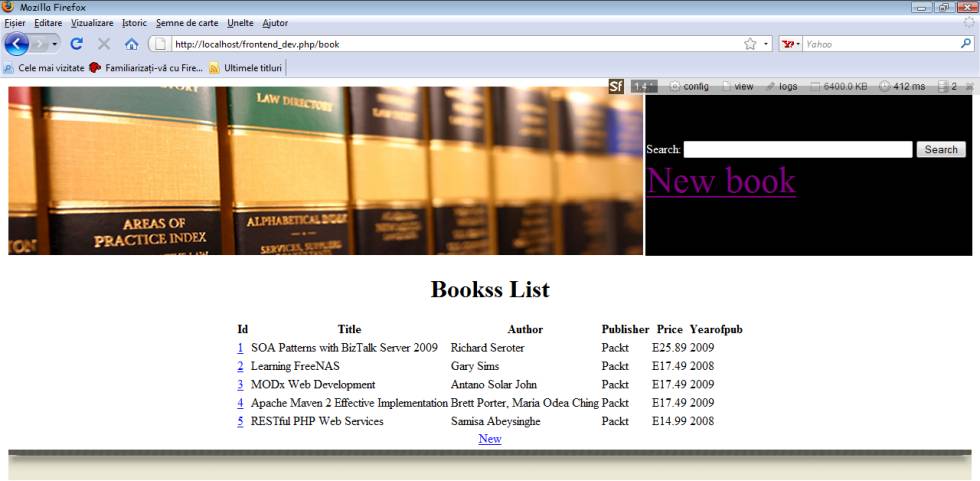
Click here for larger image
Figure 6. Testing the Book Module After Customizing the Web Page


