By: Dan Orlando
This article provides a complete
demonstration of how to get up and running with Adobe Flash
Builder 4 Beta (formerly Adobe Flex Builder) and PHP. Learn
how to take advantage of the new data-centric features of
Flash Builder to increase your workflow efficiency.
demonstration of how to get up and running with Adobe Flash
Builder 4 Beta (formerly Adobe Flex Builder) and PHP. Learn
how to take advantage of the new data-centric features of
Flash Builder to increase your workflow efficiency.
Setting Up the Right Environment
When developing Flash Builder
applications that are complemented by PHP services, it’s
most effective to install either the PHP Development Tools
(PDT) version of Eclipse or Zend Studio, then install the
plug-in version of Flash Builder. Additionally, Zend Server
is the ideal default server platform because of the ease of
use you gain through its integration with Flash Builder.
However, you can also use a Windows, Apache, MySQL, PHP
(WAMP); Linux, Apache, MySQL, PHP (LAMP); Mac, Apache,
MySQL, PHP (MAMP); or XAMPP environment setup, depending on
your local desktop platform. Although this article uses
MAMP, there are few differences between the various platform
configurations.
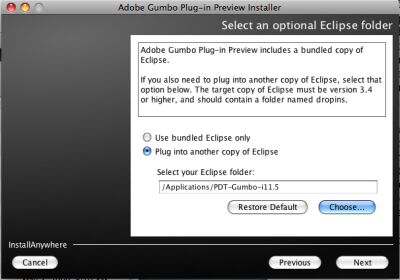
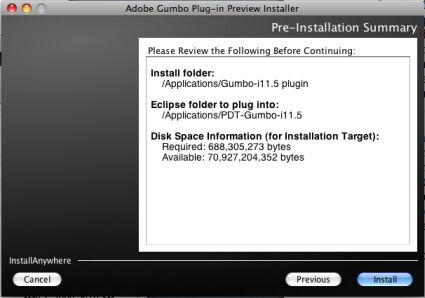
If you follow the method
recommended here, you will install the Flash Builder plug-in
into its own folder. But you must also specify the instance
of the Eclipse integrated development environment (IDE) that
you want Flash Builder plugged into, as Figures 1 and 2
show.
recommended here, you will install the Flash Builder plug-in
into its own folder. But you must also specify the instance
of the Eclipse integrated development environment (IDE) that
you want Flash Builder plugged into, as Figures 1 and 2
show.
Click here for larger image
Figure 1
Click here for larger image
Figure 2
When you first open Eclipse, from
the Window menu, point to Open
Perspective, and then click
Other. Then, choose
Flex Development. You
should then see the Flash Builder start page, which includes
links to various resources. If you have worked with Flex
Builder before, you will also notice a couple of new tabs in
Flash Builder: Data/Services and
Network Monitor. You’ll learn more about
these new tabs and their respective functionalities shortly.
Setting Up the Project
To set up a new project, from the
File menu, point to New,
and then click Flash Builder Project. You
can name your project whatever you like, but for the
application server type, select PHP from
the drop-down menu, then click Next. Your
next step is to choose the root path and URL of your local
Apache/PHP runtime. After entering these values, validate
your configuration, and then click Finish.
If Flash Builder sees that you do not already have the Zend
Framework installed, it will ask you if you want it to be
installed. This is a handy little feature that makes rapid
data communications between Flash Builder and PHP a cinch
through the Zend_Amf module, and I strongly
suggest taking advantage of it. If your project is using
Hypertext Transfer Protocol (HTTP) requests or SOAP, Flash
Builder can easily accommodate these protocols, as well.
Simply choose the respective protocol when the list of
options appears.
The first thing you may notice
when your main MXML application file is generated is that
things have changed a bit architecturally specifically with
regard to namespaces. You now have three
namespaces instead of one: fx,
mx, and s. The
s stands for Spark, which
is the new component and graphics library included in
version 4 of the Flex framework. Many of the Flex 3
Halo components have been extended significantly
for Spark. You may also notice that the Package Explorer has
been enhanced. If you’ve ever done any Java development in
the Eclipse IDE, you’ve probably seen the extensive level of
code-hinting and class introspection that is available. Most
of these features are now available for development in Flash
Builder, as well.
Generating New Services
Whenever you want to connect to a
PHP service, begin by clicking the Connect to
Data/Service link in the
Data/Services tab, as Figure 3 shows. The
default location for this tab is at the bottom of the IDE.
PHP service, begin by clicking the Connect to
Data/Service link in the
Data/Services tab, as Figure 3 shows. The
default location for this tab is at the bottom of the IDE.

Click here for larger image
Figure 3
In the first window that appears,
you have the option of connecting to a PHP service, an
HTTPService, or a Web Services Description Language (WSDL)
service. These three types of services are made available,
because you chose PHP for your server type when you set up
your project. Click the PHP icon in this
window, and then click Next. The
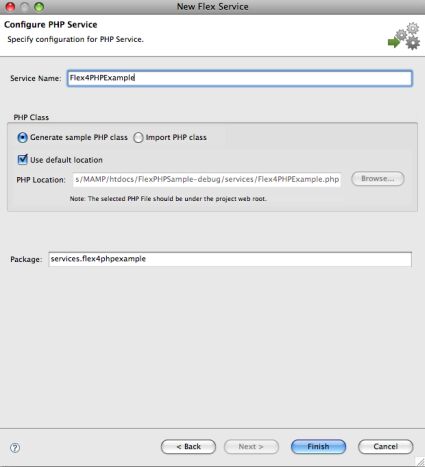
Configure PHP Service dialog now appears,
as shown in Figure 4.
Click here for larger image
Figure 4
For this example, Flash Builder
generates the PHP stub for the service. Enter a name in the
Service Name field, and select
Generate sample PHP class as well as the
Use default location check box. Then, click
Finish.
generates the PHP stub for the service. Enter a name in the
Service Name field, and select
Generate sample PHP class as well as the
Use default location check box. Then, click
Finish.
After you finish configuring your
service, you see a new folder called
services in the Package Explorer at the
root of your project. Additionally, a new services package
should appear in the src directory.
Finally, the PHP file that Flash Builder generated
automatically opens, and the class outline appears in the
Outline window in Eclipse. Flash Builder
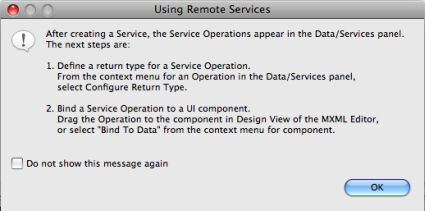
displays the Using Remote Services message,
shown in Figure 5, which outlines your next steps.
Click here for larger image
Figure 5


