As you probably know, PHP does not provide native support for custom tags, but there are a few techniques for simulating this feature. One powerful tool for adding custom tags to PHP is PRADO, a PHP 5 Web programming framework that provides support for creating custom components, which act as custom tags.
PRADO is a component-based and event-driven framework. A PRADO component represents a combination of a PHP class, an HTML template and a specification file (in XML), a combination which you can further combine with other components to form even larger components or to form complete PRADO pages. (Read “Meet PRADO, the Component-based PHP Development Framework” for a complete introduction to PRADO.)
To develop PRADO Web applications, you instantiate pre-built and application-specific component types, configure them by setting their properties, respond to their events by writing handler functions, and compose them into application tasks. Using a few examples from a demo application, this article demonstrates how to implement custom components into your PHP applications using PRADO.
Creating a Login Form
The first example is a simple login form that is created using some basic custom components such as
<com:TForm>, <com:TTextBox> and <com:TButton>. It uses an index.php file, a home.page file written in the PRADO template format, and a Home.php script that contains the Home class and prints the values from the form.Index.php
<?php

$basePath=dirname(__FILE__);
$frameworkPath=$basePath.'/../../framework/prado.php';
$assetsPath=$basePath.'/assets';
$runtimePath=$basePath.'/protected/runtime';

require_once($frameworkPath);

$application=new TApplication;
$application->run();

?>
Home.page
<com:TForm>

<fieldset><legend>Login</legend>
<label>Username:  </label>
<com:TTextBox ID="username"/>
<br />

<label>Password:  </label>
<com:TTextBox ID="password" TextMode="Password" />
<br />

<com:TButton Text="Login" OnClick="buttonClicked" />

</com:TForm>
Home.php
<?php

class Home extends TPage
{
    public function buttonClicked($sender,$param)
    {
        $username = $this->username->Text;
        echo "Username:  ".$username."<br />";

        $password = $this->password->Text;
        echo "Password:  ".$password."<br />";
    }
}

?>
Figure 1 shows the basic login form created using the PRADO template format, before and after inserting values.

Click here for larger image
Figure 1. The Basic Login Form Created Using PRADO Template Format Before and After Inserted Values
Figure 2 shows the output of the
Home.php listing.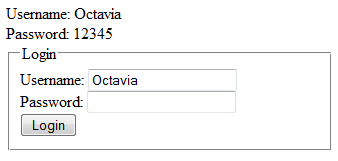
Figure 2. The Output of the Home.php Listing
Integrating PRADO Table Components into Your Application
The second example shows you how to integrate the
TTable, TTableRow and TTableCell PRADO components into your application and how to make use of the most commonly used methods for styling a table.Home.page
<com:TForm>

<com:TTable ID="table">

  <com:TTableRow ID="row1">

       <com:TTableCell Text="Name" />

       <com:TTableCell Text="Surname" />

 </com:TTableRow>

 <com:TTableRow ID="row2">

       <com:TTableCell Text="Telephone" />

       <com:TTableCell Text="Adress" />

 </com:TTableRow>

 <com:TTableRow ID="row3">

       <com:TTableCell Text="E-mail"/>
       <com:TTableCell Text="Age" />

 </com:TTableRow>

 </com:TTable>

 <com:TButton Text="View Table" OnClick="buttonClicked" />

 </com:TForm>
Figure 3 shows the initial table created using the
TTable PRADO components.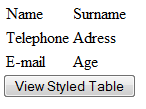
Figure 3. The Initial Table Created Using the TTable PRADO Components
Home.php
<?php

class Home extends TPage
{
public function buttonClicked($sender,$param)
    {
        //setting the background color and the border width for a table
        $table_color = $this->table->setBackColor('#FF3399');
        echo $table_color;
        $this->table->setBorderWidth('4');

        $table_border_color = $this->table->setBorderColor('#CC0066');
        echo $table_border_color;

        //setting the horizontal grid lines
        $table_grids = $this->table->setGridLines('Horizontal');
        echo $table_grids;

        //setting the cell padding
        $table_cellpadding = $this->table->setCellPadding ('20');
        echo $table_cellpadding;

        //setting a background image for the table
        $table_image =  $this->table->setBackImageUrl('1.jpg');
        echo $table_image;
    }
}

?>
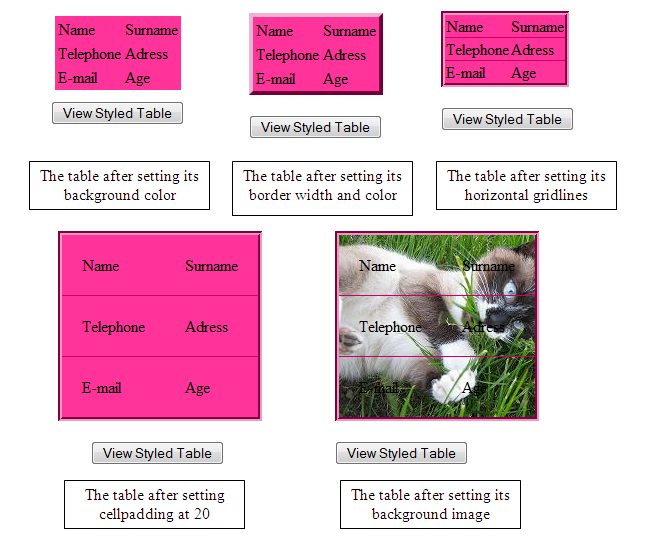
Figure 4 shows the outputs of this application listed step by step.
Click here for larger image
Figure 4. Styling a Table Step by Step