Regular PHPBuilder readers are well aware of my personal affinity for framework-driven development. These days I opt to use a framework for every conceivable web project, no matter how minor. Thankfully many other developers feel the same about the framework’s amazing breadth, because a wide range of framework solutions are available for projects large and small. For large projects, you might consider using CakePHP, Symfony, or my personal favorite, the Zend Framework. Smaller projects might take advantage of one of the many microframeworks, such as Fat-Free or Limonade.
As it happens, there are even frameworks available for those developers wishing to take advantage of the very latest PHP features such as closures and namespaces. Two such solutions are the aforementioned fat-free microframework and another relative newcomer called Fuel. Although only about 18 months old, the Fuel project has gathered a significant head of steam which powered it all the way through the recent official 1.0 release. Given the fanfare surrounding the release I’ve spent a few days learning more about Fuel, and thought it would be a good time to summarize what I’ve learned for the benefit of fellow framework aficionados.
Key Fuel Features
When it comes to frameworks, it seems the PHP community has taken the TMTOWTDI motto rather seriously, with with literally dozens of frameworks under active development. Accordingly, any new entrants will need to place special emphasis on compelling features and new approaches in order to stand out from the crowd. Fuel certainly meets that requirement. In particular I found the following features particularly interesting:
- A Git-oriented project management strategy: Git provides a command-line utility used to create a new Fuel-driven project. As an added bonus, the Fuel framework is installed as a Git submodule, encouraging users to manage the entire project in Git.
- Native support for command-line scripting: This very interesting feature allows developers to extend the
oilutility (more on this in a moment), adding custom tasks useful for building and maintaining your project. - Native RESTful API support: Although other PHP frameworks offer API capabilities, Fuel offers a particularly intuitive approach which includes a default Rest controller users can subclass and begin immediately extending their application with REST capabilities.
Installing Fuel
I’m a big fan of command-line utilities which accompany many frameworks, and found Fuel’s to be particularly compelling. To install Fuel you can use
curl to download just such a utility, which you’ll subsequently use to create and manage a Fuel-based project (this is currently only supported on Linux/Unix-based systems, and additionally requires a Git client):
$ curl get.fuelphp.com/oil | sh
[sudo] password for wjgilmore:
$
With the
oil utility installed, you can create a new project like this:
$ oil create dev.example.com
Cloning into ./dev.example.com…
remote: Counting objects: 13748, done.
remote: Compressing objects: 100% (4706/4706), done.
...
Made writable: /var/www/dev.example.com/site/fuel/app/cache
Made writable: /var/www/dev.example.com/site/fuel/app/logs
Made writable: /var/www/dev.example.com/site/fuel/app/tmp
Made writable: /var/www/dev.example.com/site/fuel/app/config
I really like this approach because Fuel is installed within the project directory as a Git submodule, allowing for easy management within the context of the project’s own Git repository. Following installation you’ll want to set your web server’s document root to point to the project’s
public directory, because that is where the front controller resides. In the case of my example that path would be:
/var/www/dev.example.com/site/public/
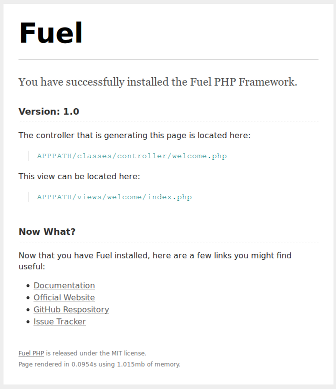
After making the changes (and likely needing to restart your web server), navigate to the project within your browser and you’ll be greeted with the default page and welcome message presented in Figure 1.

Figure 1. Fuel’s default home page
Managing Views and Layouts
Fuel is a MVC-based framework, offering developers a highly convenient way to organize, refactor, and test code. To help you get started, the default page identifies itself as being found in the project’s
views/welcome/ directory and belonging to the classes/controller/ directory. These directories are found in your project’s /fuel/app/ directory, which also happens to contain the rest of your application-specific files (except for the project assets — CSS, images, and JavaScript — which are located in the project’s public/ directory).
Updating the home page view is simple enough; open up
/fuel/app/views/welcome/index/index.php and replace the default text with your own. However what’s not so apparent Fuel’s approach to creating a site-wide layout. Implementing a layout is incredibly easy however. Start by creating a template.php file, placing it in /fuel/app/views/ directory:
<html>
 <head>
   <title>The greatest example website ever</title>
 </head>
 <body>
   <?php echo $content; ?>
 </body>
</html>
Next open the
welcome.php controller, found in /fuel/app/classes/controller/ directory and modify the index action so it looks like this:
public function action_index()
{
  $view = View::factory('template');
  $view->content = View::factory('welcome/index');
  $this->response->body = $view;
}
Reload the page and the
index view will be inserted into the location where the $content variable is rendered within the template!
Even Easier Templates
The above approach is nice, but frameworks are most effective when the developer can stay DRY. Fuel helps avoid redundancy by providing a template controller which the user can extend and in doing so not only eliminate the need to identify the template within every action, but also automate other tasks. Revise the
welcome.php controller, and modify the class so it is instead extends the Controller_Template class. Next modify the index action so it looks like this:
public function action_index()
{
  $view = View::factory('welcome/index');
  $this->template->content = $view;
}
Leave the previously created
template.php file in place, reload the browser, and you’ll achieve the same result as that had in the previous example. Additionally, you’ll be able to incorporate before() and after() methods into your controller which will execute before and after every request, respectively.
Passing Input into the View
Adhering to the best practice of never trusting user input, Fuel will automatically sanitize all data passed into the view. You’ll pass data into the view simply by assigning it to the
$view object:
public function action_index()
{
  $view = View::factory('welcome/index');
  $view->title = "Greatest. Website. Ever";
  $this->template->content = $view;
}
Within your view, just reference the
$title variable as you would any other:
<?php echo $title; ?>
Conclusion
Even after only a few brief days with Fuel, it is abundantly clear this framework has great potential, notably for significantly simplifying various commonplace tasks which have long plagued other frameworks. If you’d like to ease into framework-based development or have grown tired of dealing with other solutions’ wildly complex configuration issues, Fuel is well worth a look.
Stay tuned, as in a future article I’ll cover Fuel’s forms processing and database interaction capabilities.
Jason Gilmore is founder of the publishing, training, and consulting firm WJGilmore.com. He is the author of several popular books, including “Easy PHP Websites with the Zend Framework”, “Easy PayPal with PHP”, and “Beginning PHP and MySQL, Fourth Edition”. Follow him on Twitter at @wjgilmore.


